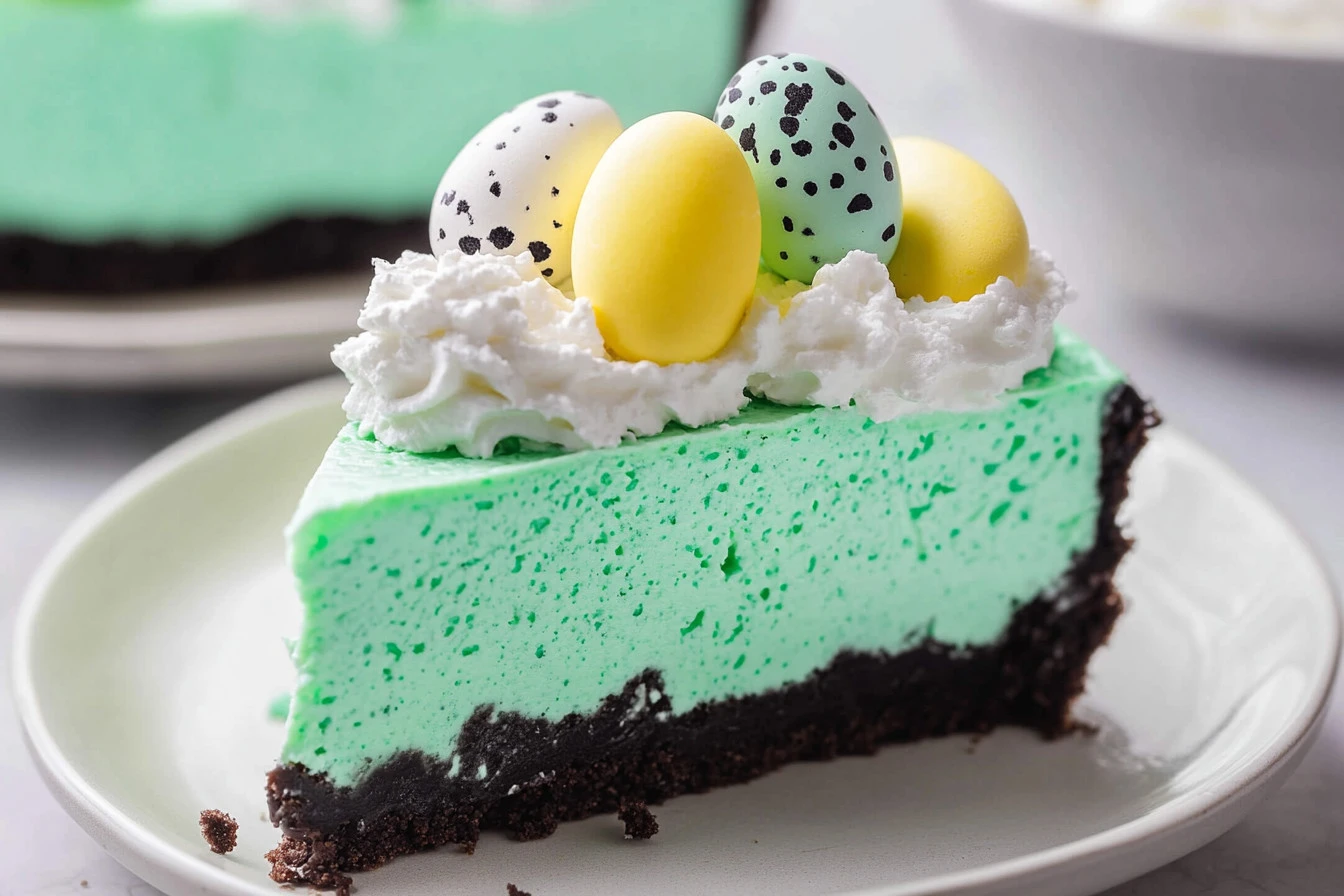
Growing up, My family always celebrated Easter with delicious treats. This Easter Cheesecake became a tradition, bringing smiles to our faces. I fondly remember making it with my kids, who loved every bite. It’s a delightful dessert perfect for family gatherings, bringing joy to your holiday table.
This cheesecake is rich, creamy, and visually stunning, making it ideal for Easter celebrations or any special occasion.
Why You’ll Love This Recipe
- Easy to prepare with simple ingredients
- Rich and creamy flavor that everyone loves
- Stunning teal color and decorations make it visually appealing
- Perfect for special occasions like Easter
- Great for sharing with family and friends
This cheesecake brings a delicious twist to traditional desserts. Its vibrant colors and fantastic taste will brighten any gathering.
How To Make Easter Cheesecake
Making this cheesecake is straightforward. With a quick preparation of the crust and the filling, you will have a show-stopping dessert for your holiday table. Follow the steps, and enjoy the process!
Star Ingredients
- Oreo cookie crumbs: For the crust, creating a delicious chocolate base.
- Salt: A pinch balances the sweetness perfectly.
- Butter: Helps bind the crust ingredients together.
- Cream cheese: The star of the dessert, providing a rich and creamy texture.
- Granulated sugar: Sweetens the filling for a delightful taste.
- Flour: Stabilizes the cheesecake filling.
- Vanilla extract: Adds a warm and inviting flavor.
- Heavy whipping cream: Lightens the cheesecake for a fluffy texture.
- Eggs: Bind the mixture together and create a rich, smooth filling.
- Food coloring: Gives the cheesecake a festive appearance.
- Whipped cream and mini Cadbury eggs: Perfect for topping and adding fun!
Simple Assembly
Crust:
- Preheat your oven to 350 degrees and prepare a 9” springform pan with non-stick spray and set aside.
- In a food processor, pulse Oreo cookies until you get 2 cups of crumbs. Add in salt and butter and pulse until combined.
- Pour into the bottom of the springform pan and using the back of a spoon, gently press the crumbs to form the crust. Be sure to bring the crumbs about 1 inch up the side.
- Bake at 350 for 10 minutes.
Cheesecake Filling:
- In the bowl of a stand mixer equipped with a paddle attachment (or using an electric hand mixer), cream the cream cheese for 2-3 minutes or until smooth and there are no lumps remaining. Mix in the sugar, flour, and mix until just combined.
- Add vanilla and mix until combined.
- Pour in the heavy cream and start whisking on low speed until combined then slowly increase speed to high for 30 seconds.
- Add in eggs one at a time, fully incorporating after each addition. Scrape the sides and bottom of the bowl. Give one final mix to make sure everything is incorporated.
- Add in food coloring at this point and mix until the color is distributed evenly.
- Pour the batter into the baked crust and smooth.
- Bake at 350 for 15 minutes, then, without opening the oven door, reduce heat to 200 and bake for an additional 50 minutes.
- Once the 50 minutes is up, turn the heat off and slightly crack the oven door for about 20-30 minutes to allow the cheesecake to slowly cool.
- Allow the cheesecake to come to room temperature and place in the refrigerator overnight.
- Once you are ready to serve, use a food-safe paintbrush to “speckle” the cheesecake.
- Top with whipped cream and mini Cadbury eggs and serve.
You Must Know
Make sure your cream cheese is at room temperature for easy mixing. Allowing the cheesecake to cool gradually will help avoid cracks. For best flavor and texture, refrigerate overnight before serving.
How To Serve Easter Cheesecake
Serve this delightful cheesecake chilled, with a dollop of whipped cream and a sprinkle of mini Cadbury eggs on top. It’s perfect for Easter gatherings and will impress your family and friends.
How To Store Easter Cheesecake
Store any leftover cheesecake in an airtight container in the refrigerator for up to five days. You can freeze it for up to three months. Be sure to wrap it well to keep it fresh.
Tips To Make Easter Cheesecake
For a smoother cheesecake, mix the filling slowly to avoid incorporating too much air. Additionally, using room temperature ingredients will ensure a better texture. Feel free to switch up colors and toppings for different occasions!
Playful Variations
Try adding different flavors like lemon or chocolate to the filling. You can also switch out the topping for fruit or different candy for a new twist. These variations keep the recipe exciting for any celebration!
Frequently Asked Questions (FAQs)
Can I use a different type of cookie for the crust?
Yes, you can use any cookie you like for the crust, such as graham crackers or chocolate chip cookies. Just crush them into fine crumbs and follow the same steps for mixing.
How do I prevent my cheesecake from cracking?
To prevent cracking, allow the cheesecake to cool slowly in the oven after baking. Also, ensure all ingredients are at room temperature before mixing, and be careful not to overmix.
Can I make this cheesecake ahead of time?
Absolutely! This cheesecake keeps well in the fridge or freezer. You can make it a day or two ahead for Easter or any special occasion, ensuring it’s nice and chilled when served.
What can I use instead of food coloring?
If you prefer not to use food coloring, you can skip it or use natural alternatives like beet juice for a subtle hue. You can also leave it plain for a classic look.
Can I freeze the cheesecake?
Yes, you can freeze the cheesecake! Wrap it tightly in plastic wrap and foil, and it will keep for up to three months. Just thaw it in the fridge before serving.
PrintEaster Cheesecake
- Prep Time: 20 minutes
- Cook Time: 1 hour 10 minutes (including cooling time)
- Total Time: 1 hour 30 minutes (plus overnight chilling)
- Yield: 12 servings 1x
- Category: Dessert
- Method: Baking
- Cuisine: American
- Diet: Vegetarian
Description
This Easter Cheesecake is a family favorite! It’s rich, creamy, and perfect for celebrating the season. A delightful treat to make this weekend with loved ones. You won’t regret it!
Ingredients
2 cups Oreo cookie crumbs
¼ teaspoon salt
5 Tablespoons butter melted
4 8 oz packages cream cheese softened
¾ cup granulated sugar
3 Tablespoons flour
1 teaspoon vanilla extract
¾ cup heavy whipping cream
3 eggs
2–3 drops teal food color
Black food color liquid
Whipped cream and mini Cadbury eggs
Instructions
1. Preheat your oven to 350 degrees and prepare a 9” springform pan with non-stick spray and set aside.
2. In a food processor, pulse Oreo cookies until you get 2 cups of crumbs. Add in salt and butter and pulse until combined.
3. Pour into the bottom of the springform pan and using the back of a spoon, gently press the crumbs to form the crust. Be sure to bring the crumbs about 1 inch up the side.
4. Bake at 350 for 10 minutes.
5. In the bowl of a stand mixer equipped with a paddle attachment (or using an electric hand mixer), cream the cream cheese for 2-3 minutes or until smooth and there are no lumps remaining. Mix in the sugar, flour, and mix until just combined.
6. Add vanilla and mix until combined.
7. Pour in the heavy cream and start whisking on low speed until combined then slowly increase speed to high for 30 seconds.
8. Add in eggs one at a time, fully incorporating after each addition. Scrape the sides and bottom of the bowl. Give one final mix to make sure everything is incorporated.
9. Add in food coloring at this point and mix until the color is distributed evenly.
10. Pour the batter into the baked crust and smooth.
11. Bake at 350 for 15 minutes then, without opening the oven door, reduce heat to 200 and bake for an additional 50 minutes.
12. Once the 50 minutes is up, turn the heat off and slightly crack the oven door for about 20-30 minutes to allow the cheesecake to slowly cool.
13. Allow the cheesecake to come to room temperature and place in the refrigerator overnight.
14. Once you are ready to serve, use a food-safe paintbrush to “speckle” the cheesecake.
15. Top with whipped cream and mini Cadbury eggs and serve.
Notes
Smooth and Creamy Texture: For the best texture, be sure to cream the cream cheese until smooth with no lumps before adding the sugar and flour. This will result in a rich, creamy cheesecake.
Proper Cooling: After baking, allow the cheesecake to cool gradually in the oven with the door slightly cracked. This helps prevent cracking and ensures a smooth top.
Food Coloring Tip: When adding food coloring, be sure to use gel food coloring for vibrant colors. Stir well to ensure the color is evenly distributed before pouring the batter into the crust.
Chill Overnight: For the best flavor and texture, refrigerate the cheesecake overnight. This allows it to set properly and enhances the overall taste.
Nutrition
- Serving Size: 1 slice (1/12 of the cheesecake)
- Calories: ~350-400 kcal
- Sugar: ~25-30g
- Sodium: ~200-250mg
- Fat: ~28-32g
- Saturated Fat: ~16-18g
- Unsaturated Fat: ~10g
- Trans Fat: ~0g
- Carbohydrates: ~30-35g
- Fiber: ~2g
- Protein: ~6-7g
- Cholesterol: ~125-150mg
Keywords: Easter cheesecake, Oreo crust, homemade cheesecake, Easter dessert, Cadbury eggs, vanilla cheesecake, heavy cream, food coloring, cheesecake recipe, springform pan, Easter treats, baked cheesecake, sweet desserts.

